Showing posts with label maintenance. Show all posts
Showing posts with label maintenance. Show all posts
New rubber.
New front tire came in last week. Now I just need to find the time to get the bloody thing on.


Riding again
Try as I might, I could not get the rear wheel off my bike. Even with the enlisted help of my wonderful assistant the tools I had wouldn't make the damn axle nut budge. Note to self...need tools for Xmas.
So yesterday I dropped the bike off at a local shop and had a person who has all the right tools put my tire on. It was done by noon and an hour later we were off and running. Couldn't have asked for better weather.
We hit my parents place to make sure things were alright while they are still on vacation and then went to the in-laws for a bite to eat. All in all, just under 200 Km on the new tire and it's amazing how different the ride feels with it.
Maintenance note: Rear tire changed at 41,091 Km.
Bits and pieces
Topped up the oil today, she was running a bit low. Also made the jump and changed up the rear brake pads. First time for myself and the manual I "borrowed" from the internet was missing the exact pages I needed to guide me through it. Oh well...nothing ventured, nothing learned.
The inside pad came out just fine, but the outside one got stuck in place by the caliper. I ended up having to take the entire brake assembly off to get the second pad out. Once that was done I had to fight with the hydralic caliper to get it to sink back into it's well. For a bit, I thought I was going to have to bleed the brake line to get the caliper to release.
I replaced what was left of the stock pads (GG grade) with EBC brand Double-H. They are supposed to give better brake response. We'll see. The underground garage doesn't give much room for testing. Today's maintenance done at 36408 KM.
Checked out the front pads and they were just fine. Only needed to be cleaned up. Seems I have been favouring the rear brakes. Tsk tsk...
There's also been a big change in Selene's appearance. I'm currently working on the write up for that.
The weather here has been fantastic for April so I've been blowing off work to pound out as many kilometers as I can. It's gonna be a damn good summer.
The inside pad came out just fine, but the outside one got stuck in place by the caliper. I ended up having to take the entire brake assembly off to get the second pad out. Once that was done I had to fight with the hydralic caliper to get it to sink back into it's well. For a bit, I thought I was going to have to bleed the brake line to get the caliper to release.
I replaced what was left of the stock pads (GG grade) with EBC brand Double-H. They are supposed to give better brake response. We'll see. The underground garage doesn't give much room for testing. Today's maintenance done at 36408 KM.
Checked out the front pads and they were just fine. Only needed to be cleaned up. Seems I have been favouring the rear brakes. Tsk tsk...
There's also been a big change in Selene's appearance. I'm currently working on the write up for that.
The weather here has been fantastic for April so I've been blowing off work to pound out as many kilometers as I can. It's gonna be a damn good summer.
Huh? Wha?
The end of February, eh? This winter can't come to an end soon enough. There's been too many problems and drama with the whole damn season and I really need to get a ride in.
On the plus side, the snow is mostly gone thanks to above freezing temperatures and plenty of rain (which was snow for everyone else).
List of things to do? Get the saddle bags repaired and a new set of rubbers. I may also have to get a new battery. My current one is from 2006 and it's never had the love of a charger. That's about it though...my little Selene is one reliable machine.
On the plus side, the snow is mostly gone thanks to above freezing temperatures and plenty of rain (which was snow for everyone else).
List of things to do? Get the saddle bags repaired and a new set of rubbers. I may also have to get a new battery. My current one is from 2006 and it's never had the love of a charger. That's about it though...my little Selene is one reliable machine.
How to Save 300+ Bucks...
Or, how I changed my own coolant.
So, on Easter Sunday I finally pushed myself out the door to the garage and got to work changing the coolant in my Honda Shadow Sabre 1100.
I had been delaying this out of fear, mostly. It's one of the most daunting things I've ever considered doing on to my bike. Well, no longer. And here I will impart my "wisdom" to you so that you need not worry or think that this is beyond your technical reach...cause it ain't.
Before we go any further...
NOTE: This guide was created to help out anyone looking for more information on changing the coolant in a Honda Shadow Sabre 1100 (VT1100C2). I am not a mechanic in any way shape or form and I do not/will not take any responsibility for any damage done to your bike. If you are unsure of doing this work, then by all means take it to the dealer to get it done.
Still here? Okay, let's move on...
Things you need:
If you follow the maintenance manual (not the owners manual, but the thick one you buy at the shop), you'll end up doing more work then necessary to get this particular job done. The biggest pain in the ass is taking the gas tank off. Here's where I'll stop you. Don't do it. In order to take the tank off, you have to shut off the fuel, pull the gas line off the petcock, then pull the vent tube off the other side. I say again...don't do this. I ended up smelling of gas for the rest of the damn day because that little petcock just wouldn't stop dripping. Yes...I did turn off the fuel.
Here's what you do. Remove the seat and take out the bolts holding the gas tank in place. With that done, just lift up the front part of the tank until you can see screws for the neck cover. The front part of the tank should stay up due to the rubber mounts on the frame. If it doesn't want to, just use something to prop it up and keep it out of the way.

Get your screw driver and remove the two plastic screws holding the neck cover in place. Two reason to be careful here:

Once the neck cover is off you have full access to the radiator fill cap and you've skipped past the ridiculous process of taking off your precious gas tank. My biggest worry was me accidentally kicking the tank and that would make for a very bad day.

Okay, moving on. Remove the filler cap and move on over to the other side of the bike. It's time to remove the bolt to drain the system. I was doubtful about what bolt it was because it really doesn't stand out. It looks like it's a normal part of the coolant pump, you know, a bolt that you would take out to disassemble it. Seems it serves a dual purpose. It's the bolt right behind the kick stand. Put your drain pan in position and use a socket or wrench to start loosening it.
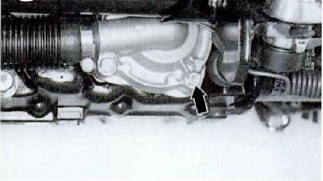
To prevent a recreation of the first time I changed the oil (read: oil forced through small hole creates a strong stream and big mess), I only loosened the bolt to the point that coolant started dribbling out and straight down into the pan. I left the bolt partially in place until almost all the coolant had drained out. As the coolant drains, loosen the bolt more and more until you have it completely removed. Careful, there's a washer on there and you don't want to lose it. It takes a bit to drain, got your favorite beverage handy?

Coolant drained? Good, check that washer on the drain bolt and make sure it looks in good condition. If it isn't, replace it. Put the bolt in a safe place and we'll move on to the real pain in the ass part.
Now you have to drain the coolant reserve tank. This part I hated. It's located between the back of the engine and the rear wheel. You can spot it by looking for the siphon tube which goes into the right side. Did you spot that siphon tube? Good, move the drain pan underneath it and remove the siphon tube from right side of the reserve tank. This took me the most time. I wasn't prepared to fight with a spring clip and a tube fitted over a flared plastic spigot. I'm guessing a couple pairs of needle nose pliers would have helped a lot at this point. But I was dead set on getting that tube off right then and there. Be prepared for a bit of a mess because you won't have much control over the speed of the coolant coming out.
With the draining all done, it's time to move onto flushing. You can skip this if you want, but only if the drained coolant isn't discoloured too much. Move the drain pan back to the original drain hole and grab that distilled water plus a funnel. Start pouring it into the filler hole in the neck and let it drain out the bottom. You have to do this with the reserve tank as well, so save some water or just have a second bottle nearby. An easy way to flush the reserve is to remove the bolt holding the reserve filler tube (beside the right rear shock) and pull it away from the bike. You can easily stick a funnel in there with that done.

Once again, wait for the system to fully drain. Got another beverage? I bet you do...
Alright, pop that drain bolt back in, snug it up (tighten to 13 N*m 115 in.-lb) and have fun putting that siphon tube back on the reserve tank. Note to self: ask for more tools for Xmas. Everything snug? Okay, let's start putting the real stuff back in.
Get your funnel and slowly start pouring the coolant back into the radiator fill point. I'll say it again...do this slowly. You don't want to introduce too much air into the coolant system. You want it to reach the bottom of the filler neck. Once that's done (don't put the filler cap on yet) fill the reserve tank to it's upper level. I propped a flashlight under the bike so I could see exactly where the coolant was in relation to the upper level mark. It's hard to see due to the fact that it's squirreled away under/behind the rear brake fluid reservoir.

Alright, now that the filling is done, we can start with the bleeding. Start the bike (yes, leave the radiator fill cap off) and let it idle for two or three minutes. Snap the throttle. As you give it throttle, should see the coolant level in the radiator fill neck drop. When you let go of the throttle the level should come back up and you will see bubbles. You have now bled some air out of the coolant system. Do this a few more times to bleed out more air and then just shut off the engine. Add coolant (if needed) to bring the level back to the bottom of the filler neck and replace the filler cap.
Start up the bike again and let it run at idle speed until it reaches normal operating temperature. Make sure the reserve tank stabilizes at the upper level, if not, add more coolant to bring it up. Cap it...your done.
Bolt the reserve filler tube back to the frame, if you took it off for easy filling. Put the neck cover back on. Push the tank back down and put the bolts in. Mount the seat back in place. Okay, it's time for a test ride. When you get back, check your levels again and check for any leaks.
That's it, you're done. Pat yourself on the back, have another beverage, but above all else...congratulate yourself on saving a few hundred bucks in labour charges. In total I spent around 34 bucks to change my own coolant and was rewarded with a great learning experience and the pride of working on my own bike.
I hope my fellow Sabre owners find this helpful.
So, on Easter Sunday I finally pushed myself out the door to the garage and got to work changing the coolant in my Honda Shadow Sabre 1100.
I had been delaying this out of fear, mostly. It's one of the most daunting things I've ever considered doing on to my bike. Well, no longer. And here I will impart my "wisdom" to you so that you need not worry or think that this is beyond your technical reach...cause it ain't.
Before we go any further...
NOTE: This guide was created to help out anyone looking for more information on changing the coolant in a Honda Shadow Sabre 1100 (VT1100C2). I am not a mechanic in any way shape or form and I do not/will not take any responsibility for any damage done to your bike. If you are unsure of doing this work, then by all means take it to the dealer to get it done.
Still here? Okay, let's move on...
Things you need:
- 2 Litres of Honda coolant (I bought the pre-mix in 1 Litre bottles)
- The usual assortment of sockets and wrenches (these are kind of important)
- Replacement washer for the coolant drain plug (you may not need it, mine was fine)
- A drain pan (mine could hold 4 Litres)
- A disposal bottle (mine could hold 4 Litres)
- Phillips head screw driver (the one from my bike tool kit worked fine)
- Funnels (or you will make a big ass mess)
- 2 Litres of distilled water (drug store)
- Flashlight (great for seeing fill marks so you don't over fill things...don't ask)
If you follow the maintenance manual (not the owners manual, but the thick one you buy at the shop), you'll end up doing more work then necessary to get this particular job done. The biggest pain in the ass is taking the gas tank off. Here's where I'll stop you. Don't do it. In order to take the tank off, you have to shut off the fuel, pull the gas line off the petcock, then pull the vent tube off the other side. I say again...don't do this. I ended up smelling of gas for the rest of the damn day because that little petcock just wouldn't stop dripping. Yes...I did turn off the fuel.
Here's what you do. Remove the seat and take out the bolts holding the gas tank in place. With that done, just lift up the front part of the tank until you can see screws for the neck cover. The front part of the tank should stay up due to the rubber mounts on the frame. If it doesn't want to, just use something to prop it up and keep it out of the way.
Get your screw driver and remove the two plastic screws holding the neck cover in place. Two reason to be careful here:
- These screws are plastic and easily messed up if you use too much force on them.
- The screws go into expanding plastic inserts that actually hold the
cover in place. These inserts can easily be lost and/or broken.
Once the neck cover is off you have full access to the radiator fill cap and you've skipped past the ridiculous process of taking off your precious gas tank. My biggest worry was me accidentally kicking the tank and that would make for a very bad day.
Okay, moving on. Remove the filler cap and move on over to the other side of the bike. It's time to remove the bolt to drain the system. I was doubtful about what bolt it was because it really doesn't stand out. It looks like it's a normal part of the coolant pump, you know, a bolt that you would take out to disassemble it. Seems it serves a dual purpose. It's the bolt right behind the kick stand. Put your drain pan in position and use a socket or wrench to start loosening it.
To prevent a recreation of the first time I changed the oil (read: oil forced through small hole creates a strong stream and big mess), I only loosened the bolt to the point that coolant started dribbling out and straight down into the pan. I left the bolt partially in place until almost all the coolant had drained out. As the coolant drains, loosen the bolt more and more until you have it completely removed. Careful, there's a washer on there and you don't want to lose it. It takes a bit to drain, got your favorite beverage handy?
Coolant drained? Good, check that washer on the drain bolt and make sure it looks in good condition. If it isn't, replace it. Put the bolt in a safe place and we'll move on to the real pain in the ass part.
Now you have to drain the coolant reserve tank. This part I hated. It's located between the back of the engine and the rear wheel. You can spot it by looking for the siphon tube which goes into the right side. Did you spot that siphon tube? Good, move the drain pan underneath it and remove the siphon tube from right side of the reserve tank. This took me the most time. I wasn't prepared to fight with a spring clip and a tube fitted over a flared plastic spigot. I'm guessing a couple pairs of needle nose pliers would have helped a lot at this point. But I was dead set on getting that tube off right then and there. Be prepared for a bit of a mess because you won't have much control over the speed of the coolant coming out.
With the draining all done, it's time to move onto flushing. You can skip this if you want, but only if the drained coolant isn't discoloured too much. Move the drain pan back to the original drain hole and grab that distilled water plus a funnel. Start pouring it into the filler hole in the neck and let it drain out the bottom. You have to do this with the reserve tank as well, so save some water or just have a second bottle nearby. An easy way to flush the reserve is to remove the bolt holding the reserve filler tube (beside the right rear shock) and pull it away from the bike. You can easily stick a funnel in there with that done.
Once again, wait for the system to fully drain. Got another beverage? I bet you do...
Alright, pop that drain bolt back in, snug it up (tighten to 13 N*m 115 in.-lb) and have fun putting that siphon tube back on the reserve tank. Note to self: ask for more tools for Xmas. Everything snug? Okay, let's start putting the real stuff back in.
Get your funnel and slowly start pouring the coolant back into the radiator fill point. I'll say it again...do this slowly. You don't want to introduce too much air into the coolant system. You want it to reach the bottom of the filler neck. Once that's done (don't put the filler cap on yet) fill the reserve tank to it's upper level. I propped a flashlight under the bike so I could see exactly where the coolant was in relation to the upper level mark. It's hard to see due to the fact that it's squirreled away under/behind the rear brake fluid reservoir.
Alright, now that the filling is done, we can start with the bleeding. Start the bike (yes, leave the radiator fill cap off) and let it idle for two or three minutes. Snap the throttle. As you give it throttle, should see the coolant level in the radiator fill neck drop. When you let go of the throttle the level should come back up and you will see bubbles. You have now bled some air out of the coolant system. Do this a few more times to bleed out more air and then just shut off the engine. Add coolant (if needed) to bring the level back to the bottom of the filler neck and replace the filler cap.
Start up the bike again and let it run at idle speed until it reaches normal operating temperature. Make sure the reserve tank stabilizes at the upper level, if not, add more coolant to bring it up. Cap it...your done.
Bolt the reserve filler tube back to the frame, if you took it off for easy filling. Put the neck cover back on. Push the tank back down and put the bolts in. Mount the seat back in place. Okay, it's time for a test ride. When you get back, check your levels again and check for any leaks.
That's it, you're done. Pat yourself on the back, have another beverage, but above all else...congratulate yourself on saving a few hundred bucks in labour charges. In total I spent around 34 bucks to change my own coolant and was rewarded with a great learning experience and the pride of working on my own bike.
I hope my fellow Sabre owners find this helpful.
Woo Hoo!
Happy 1st day of spring to all my fellow two wheeled riders out there! Isn’t it nice to shed off that winter mind set!

In celebration, I went out and bought some things to help me keep Selene clean. And last night (this morning actually, around 2am) I went over to the garage and changed up the final drive oil. That’s the second of three fluids that needed changing. The last, and most daunting, is the coolant. That might be a two man job as I have to remove the gas tank in order to get at the radiator cap. Things like this make it annoying to own a liquid cooled bike. And really…do we need liquid cooled bikes in Canada? LOL.
Selene is safe
And has been for sometime now. I finally inquired with the superintendant and moved her over to building 2's underground garage. She is quite safe and secure over there and I can visit anytime I wish.
As a matter of fact, I was over just last week to give her a bath and make sure everything was okay. She got multiple compliments and even a offer from someone to keep an eye on her. The only problem I have is that she was out in the bad weather for a little too long. The new signal lights that I bought for her need to be replaced. It didn't take long for them to get corroded and pitted. I'm guessing they don't make those to survive snow and salt. Oh well, at least they weren't that expensive and should be quite easy to replace.
As a matter of fact, I was over just last week to give her a bath and make sure everything was okay. She got multiple compliments and even a offer from someone to keep an eye on her. The only problem I have is that she was out in the bad weather for a little too long. The new signal lights that I bought for her need to be replaced. It didn't take long for them to get corroded and pitted. I'm guessing they don't make those to survive snow and salt. Oh well, at least they weren't that expensive and should be quite easy to replace.
Motorcycle watering can
So, in my efforts to keep Selene clean I have invested in one of these:

You see, we live in an apartment building and there is no access to outside water taps. I was finding it rather difficult to keep filling up buckets, dragging them downstairs and pouring them over Selene. This holds as much as the buckets, but I use less of it because I can actually direct the water where I need it.
I used it yesterday to clean up Selene for the ride on Saturday and It works like a charm. You can pressurize it, it's made of metal and you can control the water to be a stream or mist. I think I may have to spraypaint it black though...
If it wasn't for bad news...
we wouldn't know what good news is.
Our car is dying. It might last a couple of months or a couple of weeks, but either way we are going to lose our main mode of transportation. It's a 1998 Dodge Neon and has recently blown it's third head gasket. Aside from that, the engine is making an awful grinding noise and the transmission is giving out. Replacing both would cost us a cool two grand and honestly, I don't think it's worth it. It's time to move on.
In the meantime, my bike is still in the shop getting it's tires put on. Next time, I'll have the tools to take off the wheels because this is wacky. There is no way that it should take a week to get the tires changed. It sure as hell would take a lot of wear and tear away from the car and save us the trouble of driving around in a vehicle that sounds like it's going to explode.
So, today (the gorgeous day that it was) was spent doing this...

While I felt like this...

I'm sure there is good news out there...somewhere...right?
Today I rode...
and it was rather unexpected.
The day started with what was supposed to happen yesterday. Had everything gone the way it was planned, Selene would have had her new tires on and I would have had the rims polished. Of course, we all know what happens to the best laid plans.
Me and Joey went down yesterday with full intentions on removing the wheels, but that changed once I realized that I didn't have the proper tools. For the first time ever, Selene was up on her jack and fully stabilized. That entire ordeal took about an hour and a half and a whole lot of creativity, but nothing more then a forceful shove would knock that bike over.
With that done, I pulled out my socket set and quickly realized that all my sockets were too small for the nut holding the axle in place. Also, none of my adjustable wrenches would fit. Dejected, we took Selene off the jack and vowed to return the next day with the proper tools. That meant a shopping trip and a full day delay to my plans.
Flip to today and us browsing Sears and Canadian Tire auto centers which taught me a lesson: tools are really expensive. You see, I don't skimp. I refuse to buy cheap tools because I fully believe that you get what you pay for and if something is going to fail on you, it will do it when you need it most.
A quick bout of frustration and a phone call later; I find out that taking Selene to the dealership and getting the tires done there is actually cheaper then me buying the tools. Done deal. I can always ask for more tools for my birthday or Christmas.
Half an hour later we are at the storage place with Selene's battery and are quickly putting her back together. It took a few pushes of the start button and some nice words, but she sleepily came to life and was more then happy to navigate the hallways to the garage. I quickly gear up and hit the road.
-9 C (16 F) with the wind in mid March, I'm riding and it felt good. Free once again. It was hard to believe that the night before it had been snowing enough to cover everything. I got Strange looks from everyone, but at least they were looking. I guess it's hard not to notice the only bike on the road.
At the dealership I got the usual comments: Hardcore, crazy, committed. It was all in good fun and I love seeing the looks on their faces when I ride up and walk in.
So, there you have it. My last couple of days all summed up nicely. I don't have any pictures because I quite simply forgot to take any...oops. Brand new camera and I don't get any shots of my first ride of the season...heh. I promise to get pictures when I pick her up. I'm sure Selene will be more then happy to show off her new set of shoes.
Happy Anniversary
Well, here I am, one year later. I'm still a biker nut, I still have my sanity and things are actually going pretty well.
To celebrate a little, I've updated the look of the blog. If things don't look quite right, you'll have to bear with me. I'm still going to be making little changes here and there and I'm really hoping to turn this into a three column blog, but I have no idea how to set that up. If anyone has any ideas, I'd be glad to hear them.
Time was on my side yesterday, so I got a chance to get down and work on Selene for a while. The biggest thing I have left now is the wheels. Once they are off, I'll be able to clean them and get the new rubber put on. My lease on the storage unit is up at the end of March, so I'm hoping that the weather is going to be agreeable and let me ride her out of there.
Speaking of the weather, it's been super mild here with lots of rain. Needless to say, we have lost a lot of our snow. Can't say I'm sorry to see it go. The faster I can get back on two wheels, the happier I'll be.
To celebrate a little, I've updated the look of the blog. If things don't look quite right, you'll have to bear with me. I'm still going to be making little changes here and there and I'm really hoping to turn this into a three column blog, but I have no idea how to set that up. If anyone has any ideas, I'd be glad to hear them.
Time was on my side yesterday, so I got a chance to get down and work on Selene for a while. The biggest thing I have left now is the wheels. Once they are off, I'll be able to clean them and get the new rubber put on. My lease on the storage unit is up at the end of March, so I'm hoping that the weather is going to be agreeable and let me ride her out of there.
Speaking of the weather, it's been super mild here with lots of rain. Needless to say, we have lost a lot of our snow. Can't say I'm sorry to see it go. The faster I can get back on two wheels, the happier I'll be.

the new tire hunt
the hunt for new tires has been going on for some time now. the stock Dunlops that are on Selene have well over 13,000 km on them and are quite worn. the rear tire also has a plug that was the result of a nail picked up in Quebec. the search has been a battle of brands and prices, meaning i want a good brand at a good price. the Dunlops were great, but i want something better.
i've been all over the net and have even debated about buying my tires from the states and having them shipped to Canada. Cruiser Customizing always has great deals and were actually selling tires at 40% off regular price. i really didn't think i could get a better deal then that.
before i ordered, though, i figured i would check out a couple of local places and give them a chance. i'm all for sinking my money locally.
okay, tires sizes:
front: 120/90 R18
rear: 170/80 R15
tire brands:
Pirelli MT66 Route
Avon Venom
Metzeler ME880
i still chuckle at the fact that i had Pirellis on my Kawasaki 440LTD, but i digress. a few calls around town gave me these average prices (both tires, tax not included, in canadian funds):
Pirelli: $351
Avon: $396
Metzeler: $498
Cruiser Customizing was giving me prices of (in US funds):
Pirelli: $225
Avon: $340
Metzeler: $347
it was really looking good for Cruiser Customizing. i could get a damn good set of tires (Metzeler) for a heck of a lot less then any local place. even with the duty and exchange factored in, i would end up saving money.
then i called the last local place on my list. a place that i'd never seen before due to the fact that they are a little out of my way. a little place called Levesque Recreation. i hit them up with the brands and a few minutes later, they came back with prices:
Pirelli: $261
Avon: not listed in their books
Metzeler: $375
here is the real kicker...those are the straight prices with taxes in. sold! i couldn't believe the price difference.
i went down the next day to check out the shop and double check the prices. they are a small outfit with a small stock of helmets, tires and some parts. they do mechanical work on practically all makes and models (i could see a H-D and a snowmobile being worked on in the garage). there was also a beautiful boxer running around and investigating everything. he was behind the counter the whole time, but would stand up at the counter staring at you while chewing on whatever he could get his teeth on. i'll have to snap a picture of him when i pick up my tires.
so there you have it. it really does pay to shop around. it's a lesson that i have to learn time and time again. i'm famous for impluse purchases...ask joey...
i've been all over the net and have even debated about buying my tires from the states and having them shipped to Canada. Cruiser Customizing always has great deals and were actually selling tires at 40% off regular price. i really didn't think i could get a better deal then that.
before i ordered, though, i figured i would check out a couple of local places and give them a chance. i'm all for sinking my money locally.
okay, tires sizes:
front: 120/90 R18
rear: 170/80 R15
tire brands:
Pirelli MT66 Route
Avon Venom
Metzeler ME880
i still chuckle at the fact that i had Pirellis on my Kawasaki 440LTD, but i digress. a few calls around town gave me these average prices (both tires, tax not included, in canadian funds):
Pirelli: $351
Avon: $396
Metzeler: $498
Cruiser Customizing was giving me prices of (in US funds):
Pirelli: $225
Avon: $340
Metzeler: $347
it was really looking good for Cruiser Customizing. i could get a damn good set of tires (Metzeler) for a heck of a lot less then any local place. even with the duty and exchange factored in, i would end up saving money.
then i called the last local place on my list. a place that i'd never seen before due to the fact that they are a little out of my way. a little place called Levesque Recreation. i hit them up with the brands and a few minutes later, they came back with prices:
Pirelli: $261
Avon: not listed in their books
Metzeler: $375
here is the real kicker...those are the straight prices with taxes in. sold! i couldn't believe the price difference.
i went down the next day to check out the shop and double check the prices. they are a small outfit with a small stock of helmets, tires and some parts. they do mechanical work on practically all makes and models (i could see a H-D and a snowmobile being worked on in the garage). there was also a beautiful boxer running around and investigating everything. he was behind the counter the whole time, but would stand up at the counter staring at you while chewing on whatever he could get his teeth on. i'll have to snap a picture of him when i pick up my tires.
so there you have it. it really does pay to shop around. it's a lesson that i have to learn time and time again. i'm famous for impluse purchases...ask joey...
more maintenance
last sunday blessed me with some spare time to spend with Selene. this is only the second trip i've been able to make to her storage area in order to do the maintenance that i need/want to do. i packed up my usual stuff (coffee, munchies, music and tools) and headed off.
this trip was a test of how anal i can get when i'm cleaning something. as i was sitting next to Selene grooving to Deadbolt on my mp3 player i noticed how dirty the cooling fins on the engine were. knowing that these fins were mostly for looks (liquid cooled engine and all) it struck me that they should at least look clean. after poking around a bit, i noticed that there were several allen bolts holding the fins in place. i pulled out the bike's tool kit (yes, mine actually came with one) and removed the bolts. the fins came off rather easily and gave me this odd look at the engine.

so i sat there and cleaned and cleaned. i found out how difficult it is to get clean those damn little fins and realized that it was too late to stop. in the several hours that i was there i only got the right upper rear fins and most of the lower half cleaned. it was a real pain to get between the fins and getting the corrosion off the exposed aluminum was killing my fingers. to be fair, i really didn't have the right tools to clean between the fins. a screw driver and cloth have to be used very carefully...you really don't want to scratch anything. so yeah, i think new cleaning tools are in order.
the unfortunate thing is, that's all i got done. i spent an entire evening there and it felt like i got no where and there's so much more to do! not to mention the fact that i still haven't got my jack from my parents to remove the wheels for cleaning and new rubber. i want winter gone so much that i'm not thinking about how much time i need to clean...lol. of course, life always throws you a curve ball or two, like last week with joey in the hospital. no details here, but she is now doing well and back to her complaining self ;) i'm gonna get smacked for that one...
i know most people wouldn't even try to clean that hard and others would call me nuts for doing it, but i really care for the bike and want it to look as good as possible. i don't do it for anyone else but myself. it bugs me when she is dirty and it really irks me when i see rust, corrosion or chips. i've already turned one bike into a fixer-upper due to my own stupidity and i won't allow it to happen to this one.
this trip was a test of how anal i can get when i'm cleaning something. as i was sitting next to Selene grooving to Deadbolt on my mp3 player i noticed how dirty the cooling fins on the engine were. knowing that these fins were mostly for looks (liquid cooled engine and all) it struck me that they should at least look clean. after poking around a bit, i noticed that there were several allen bolts holding the fins in place. i pulled out the bike's tool kit (yes, mine actually came with one) and removed the bolts. the fins came off rather easily and gave me this odd look at the engine.
so i sat there and cleaned and cleaned. i found out how difficult it is to get clean those damn little fins and realized that it was too late to stop. in the several hours that i was there i only got the right upper rear fins and most of the lower half cleaned. it was a real pain to get between the fins and getting the corrosion off the exposed aluminum was killing my fingers. to be fair, i really didn't have the right tools to clean between the fins. a screw driver and cloth have to be used very carefully...you really don't want to scratch anything. so yeah, i think new cleaning tools are in order.
the unfortunate thing is, that's all i got done. i spent an entire evening there and it felt like i got no where and there's so much more to do! not to mention the fact that i still haven't got my jack from my parents to remove the wheels for cleaning and new rubber. i want winter gone so much that i'm not thinking about how much time i need to clean...lol. of course, life always throws you a curve ball or two, like last week with joey in the hospital. no details here, but she is now doing well and back to her complaining self ;) i'm gonna get smacked for that one...
i know most people wouldn't even try to clean that hard and others would call me nuts for doing it, but i really care for the bike and want it to look as good as possible. i don't do it for anyone else but myself. it bugs me when she is dirty and it really irks me when i see rust, corrosion or chips. i've already turned one bike into a fixer-upper due to my own stupidity and i won't allow it to happen to this one.
and it's done
it finally happened. it's officially too cold for me to ride. there's something about -10 to -25 degree (14 to -13 F) weather that makes it really hard to mount up and be comfortable. Selene spent the better part of a week at the shop because two days after i dropped her off the weather took a turn. we don't have a lot of snow, but the cold weather is making it stick around.
i have to hand it to Eldridge's Harley-Davidson, though. they were nice enough to deliver Selene right to the storage place at no charge to me. here is a shot of the truck pulling in.

once we rolled her inside, i started her up for one last ride. it was quite a treat to navigate the hallways between storage units and i had several tight turns to negotiate.
finally she was backed into her new home and here is joey actually tucking Selene in. who says your wife and your mistress can't get along. ;)

all that took place on thursday the 18th and i hated to leave her there. the only solace i can take is that it's only a couple of months and i'll have her on the road again.
in the meantime i've got things to do with her. sunday i spent several hours cleaning her up, but only got about a quarter of the way through my list. i still have a lot of cleaning and polishing to do along with the removal of her wheels. i can't do that without my jack though and that will require a trip to my parents house where the jack is stored.
sunday was very relaxing. i took a coffee with me, my mp3 player and something to snack on. that day i picked up a folding stool so i didn't have to stand over the bike all the time. i had the entire place to myself while listening to Big Bad Voodoo Daddy.
as a list to myself, this is what i have done so far:
- waxed the tank and fenders
- checked the air filter (and almost lost the screw)
- removed the backrest for cleaning
- cleaned the tail light (dusty inside)
- cleaned under the seat
- polished the mufflers
- polished the rear fender rails
i still have a long way to go and one big part of that is cleaning the aluminum rims...they are a real mess. the job should be much easier once the wheels are actually off though.
so right now it's all maintenance, watching biker buildoff and american chopper. please let winter be over soon...