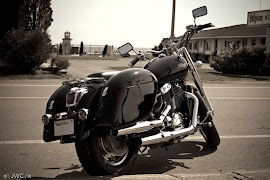
I have discovered...

That I really don't like my days/life being planned.  Being on LoA from work really brought a sense of zen to my days.  Waking up with no reason to rush gave me a chance to savour the day and do what I wanted to do.  Dare I say that my LoA was a holiday in the true sense of the word.  Let me explain...

This "holiday" started out with surgery, which put me out for a couple of weeks.  No heavy lifting, no running or jumping about, no real expectations.  After the first week I had a fair amount of mobility back, but I still couldn't do anything strenuous nor was anything expected of me.  The month of July was probably the most relaxing and stress free month I've had in a long time.  Isn't that what a holiday should be?  Do what you want for the time you have with no deadlines or real expectations.

Once I was able to ride again, I was in heaven.  Wake up in the morning, have a bite to eat while surfing the web for bit, check the weather and go for a short ride.  I know...hard life, eh?  Mind you, I didn't turn into a lump that just laid in bed all day.  I still got things done around the house, but usually got scolded for it.

The only true downfall is that LoA means no income.  So we are pretty hard pressed right now while we wait for UI and benefits to come in and cover the time I missed.

Personally, I think that anyone who owns a motorcycle should have the whole summer off.  Yeah, that would do just fine...

Happy Canada Day!

IMGP5311

Figured I’d get this up before the day completely dwindled away on me.  It’s nice that I was able to get out for a ride today and it’s only fitting that it’s my last day of my leave of absence from work.  Back to the grind tomorrow, I guess.

It was a fun ride with a couple of guys from the club.  I got a little patriotic and zip tied a flag to bike.  That combined with the flag patches and Canadian themed club symbol you could say we were a little decked out for our country’s birthday.

I’ve taken a bit of a break from the blog while I was on LOA.  There are reasons for that, but I won’t be getting into them here.  I’m all healed up from the surgery and things went fine.  I just ended up being off a little longer then expected.  Can’t say it wasn’t a nice “vacation”. :)

No more riding

At least for a while, but I'll get to that in a minute.

Yesterday was "ride it like you stole it day" for me.  It was my last day to ride for a while and I took advantage of it as much as I could.  I took Joey out for a spin before she went off to work and then the rest of the evening was mine.  I hit the back roads and did some of the most aggressive riding I've done in quite some time.  Nothing too far over the speed limit, but I was pushing my own limits on the twisties.  it was great though and I haven't felt quite that "alive" in some time.  It's nice to ride with my group and go on leisurely country rides, but every now and then you have to break out.  Yesterday reminded me of why I usually ride alone.

I took my camera with me, but for some reason I didn't want to stop.  Stopping meant taking me out of my groove and I was having way too much fun to do that.

Now to the reason I won't be riding.  I have to go in for surgery tomorrow and it's going to put me out for a bit.  No heavy lifting for two months, no work and no riding for a minimum of two weeks.  So you can see why I hit the road as hard as I did yesterday.

I have no doubt that I'm going to be a bear to live with and every sunny day is going to make it worse.

I'll report back when it's all said and done.  We'll see how long I'm actually kept off the bike...

test

How to Save 300+ Bucks...

Or, how I changed my own coolant.

So, on Easter Sunday I finally pushed myself out the door to the garage and got to work changing the coolant in my Honda Shadow Sabre 1100.

I had been delaying this out of fear, mostly. It's one of the most daunting things I've ever considered doing on to my bike. Well, no longer. And here I will impart my "wisdom" to you so that you need not worry or think that this is beyond your technical reach...cause it ain't.

Before we go any further...

NOTE: This guide was created to help out anyone looking for more information on changing the coolant in a Honda Shadow Sabre 1100 (VT1100C2). I am not a mechanic in any way shape or form and I do not/will not take any responsibility for any damage done to your bike. If you are unsure of doing this work, then by all means take it to the dealer to get it done.

Still here? Okay, let's move on...

Things you need:
  • 2 Litres of Honda coolant (I bought the pre-mix in 1 Litre bottles)
  • The usual assortment of sockets and wrenches (these are kind of important)
  • Replacement washer for the coolant drain plug (you may not need it, mine was fine)
  • A drain pan (mine could hold 4 Litres)
  • A disposal bottle (mine could hold 4 Litres)
  • Phillips head screw driver (the one from my bike tool kit worked fine)
  • Funnels (or you will make a big ass mess)
  • 2 Litres of distilled water (drug store)
  • Flashlight (great for seeing fill marks so you don't over fill things...don't ask)

If you follow the maintenance manual (not the owners manual, but the thick one you buy at the shop), you'll end up doing more work then necessary to get this particular job done. The biggest pain in the ass is taking the gas tank off. Here's where I'll stop you. Don't do it. In order to take the tank off, you have to shut off the fuel, pull the gas line off the petcock, then pull the vent tube off the other side. I say again...don't do this. I ended up smelling of gas for the rest of the damn day because that little petcock just wouldn't stop dripping. Yes...I did turn off the fuel.

Here's what you do. Remove the seat and take out the bolts holding the gas tank in place. With that done, just lift up the front part of the tank until you can see screws for the neck cover. The front part of the tank should stay up due to the rubber mounts on the frame. If it doesn't want to, just use something to prop it up and keep it out of the way.


Get your screw driver and remove the two plastic screws holding the neck cover in place. Two reason to be careful here:
  1. These screws are plastic and easily messed up if you use too much force on them.
  2. The screws go into expanding plastic inserts that actually hold the
    cover in place. These inserts can easily be lost and/or broken.


Once the neck cover is off you have full access to the radiator fill cap and you've skipped past the ridiculous process of taking off your precious gas tank. My biggest worry was me accidentally kicking the tank and that would make for a very bad day.


Okay, moving on. Remove the filler cap and move on over to the other side of the bike. It's time to remove the bolt to drain the system. I was doubtful about what bolt it was because it really doesn't stand out. It looks like it's a normal part of the coolant pump, you know, a bolt that you would take out to disassemble it. Seems it serves a dual purpose. It's the bolt right behind the kick stand. Put your drain pan in position and use a socket or wrench to start loosening it.


To prevent a recreation of the first time I changed the oil (read: oil forced through small hole creates a strong stream and big mess), I only loosened the bolt to the point that coolant started dribbling out and straight down into the pan. I left the bolt partially in place until almost all the coolant had drained out. As the coolant drains, loosen the bolt more and more until you have it completely removed. Careful, there's a washer on there and you don't want to lose it. It takes a bit to drain, got your favorite beverage handy?


Coolant drained? Good, check that washer on the drain bolt and make sure it looks in good condition. If it isn't, replace it. Put the bolt in a safe place and we'll move on to the real pain in the ass part.

Now you have to drain the coolant reserve tank. This part I hated. It's located between the back of the engine and the rear wheel. You can spot it by looking for the siphon tube which goes into the right side. Did you spot that siphon tube? Good, move the drain pan underneath it and remove the siphon tube from right side of the reserve tank. This took me the most time. I wasn't prepared to fight with a spring clip and a tube fitted over a flared plastic spigot. I'm guessing a couple pairs of needle nose pliers would have helped a lot at this point. But I was dead set on getting that tube off right then and there. Be prepared for a bit of a mess because you won't have much control over the speed of the coolant coming out.

With the draining all done, it's time to move onto flushing. You can skip this if you want, but only if the drained coolant isn't discoloured too much. Move the drain pan back to the original drain hole and grab that distilled water plus a funnel. Start pouring it into the filler hole in the neck and let it drain out the bottom. You have to do this with the reserve tank as well, so save some water or just have a second bottle nearby. An easy way to flush the reserve is to remove the bolt holding the reserve filler tube (beside the right rear shock) and pull it away from the bike. You can easily stick a funnel in there with that done.


Once again, wait for the system to fully drain. Got another beverage? I bet you do...

Alright, pop that drain bolt back in, snug it up (tighten to 13 N*m 115 in.-lb) and have fun putting that siphon tube back on the reserve tank. Note to self: ask for more tools for Xmas. Everything snug? Okay, let's start putting the real stuff back in.

Get your funnel and slowly start pouring the coolant back into the radiator fill point. I'll say it again...do this slowly. You don't want to introduce too much air into the coolant system. You want it to reach the bottom of the filler neck. Once that's done (don't put the filler cap on yet) fill the reserve tank to it's upper level. I propped a flashlight under the bike so I could see exactly where the coolant was in relation to the upper level mark. It's hard to see due to the fact that it's squirreled away under/behind the rear brake fluid reservoir.


Alright, now that the filling is done, we can start with the bleeding. Start the bike (yes, leave the radiator fill cap off) and let it idle for two or three minutes. Snap the throttle. As you give it throttle, should see the coolant level in the radiator fill neck drop. When you let go of the throttle the level should come back up and you will see bubbles. You have now bled some air out of the coolant system. Do this a few more times to bleed out more air and then just shut off the engine. Add coolant (if needed) to bring the level back to the bottom of the filler neck and replace the filler cap.

Start up the bike again and let it run at idle speed until it reaches normal operating temperature. Make sure the reserve tank stabilizes at the upper level, if not, add more coolant to bring it up. Cap it...your done.

Bolt the reserve filler tube back to the frame, if you took it off for easy filling. Put the neck cover back on. Push the tank back down and put the bolts in. Mount the seat back in place. Okay, it's time for a test ride. When you get back, check your levels again and check for any leaks.

That's it, you're done. Pat yourself on the back, have another beverage, but above all else...congratulate yourself on saving a few hundred bucks in labour charges. In total I spent around 34 bucks to change my own coolant and was rewarded with a great learning experience and the pride of working on my own bike.

I hope my fellow Sabre owners find this helpful.


Copyright 2006| Blogger Templates by GeckoandFly modified and converted to Blogger Beta by Blogcrowds.
No part of the content or the blog may be reproduced without prior written permission.