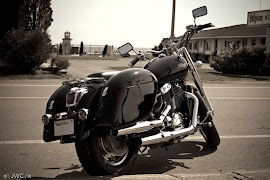
AKA: How me and my Dad spent our Saturday.
I kid you not. Installing these bags took us most of our Saturday. I do have some advice for people installing these types of bags: follow the instructions and don't second guess yourself. You'll see where that comes from soon enough.
To start, these bags are super easy to scratch. Make sure you have something covering your work area to prevent any marring. That's another lesson I learned and I'm still trying to figure out a way to buff scratches out of fiber glass.
On to the installation...
You will need these tools:
Drill
3/18 bit
5/8 bit
Painters tape
Ratchet
Sockets
A very straight wall
One thing you have to keep in mind is that these bags are not perfect. There are minor flaws, but you can work around them.
First off, you want to start on the right side of the bike (providing that's where your muffler is). The positioning of the bag above the muffler is the most important part. Break off a piece of foam from the packaging and use the painters tape to hold it in place on top of your muffler. This will give you a place to lay the bag while you are fitting it and it will also serve to give you the perfect spacing from the pipes.

With the foam in place you can remove the bolts in the fender rail on the right hand side. With that done, you can put the mounting brackets in place so you can figure out how everything lines up. Here is where one of my problems surfaced. The brake caliper on the right hand side is on the upper portion of the wheel. This meant that no matter where I placed the front bracket, it was always in the way of the caliper.
The mounting hardware comes with spacers, but there are only eight spacers. This means you can put a maximum of two on each bracket. Even with two spacers, there still wasn't enough room to clear the caliper. My biggest worry was the caliper making contact with the brackets. I can only imagine the disaster if that happened. Had two of the brackets been shorter, then there wouldn't have been a problem. The only thing we could do was angle the brackets further toward the rear of the bike.

Like the instructions indicated, we put painters tape on the area that needed to be drilled. This also helped us in marking where the holes for the brackets needed to be. It took my skinny little hands to make those marks while my Dad held the bag to the bike. I could only make half a circle due to the cramped quarters, so once the bag was off we matched up the bracket and finished drawing the circle. After that, it was just a matter of finding the center of the mark.

I have no pictures of the drilling due to the fact that I had to hold the bags in place. I'm sure you can picture what it looks like though. ;) Be careful drilling the holes and remember that you are working with fiber glass. It will splinter quite easily even with the tape on it. Go slow and be wary of the carpet on the inside of the bag. It's also a good idea to touch up the holes with paint to prevent any further splintering.
With the holes drilled, it's always a good idea to test the mounting one final time to make sure everything looks good. Once that's done, mount the brackets to the bag and use painters tape the second set of brackets to the first.

Put painters tape on the inside surface of the second bag and use a straight wall to line them up as best as possible (Note: the black hinges will mark a white wall). This is where you will discover if there are any imperfections in the bags. This is also where we screwed up. We lined up the bags and I marked where the holes should go. When we sat back and looked at them, they didn't seem to match up. An hour and some measuring later, we were sure that the marks were wrong. I made a template that we could flip over and marked the new holes which we were sure would work. We were wrong and the bag ended up sitting too far forward and way out of line with the other one. A new set of holes had to be drilled with new positioning of the bag. I state again, follow the instructions and do not second guess yourself.


That's it. Once the second one is ready, do the test fit and you should be good. Use the supplied hardware, mount the bags permanently and your bike should have a sexy behind like this:

Due to our mistake, there were two extra holes in the left side bag. We fixed this up with silicone and black duct tape. Because it's facing the bike, you don't even notice it and the silicone seals the holes.

Here are some things that we changed and a few others that I'm going to change:
We didn't like how small the washers were for the inside of the bags. Instead we used larger washers, that my father had in his collection of odds and ends, to help distribute the weight of the bags on the bolts.
Having two separate spacers on each mounting bracket looks bad. I have full intentions on buying single large spacers for each bracket.
The rubber grommets that are used for sealing the outside of the bags (at the drilled holes) are already starting to crack. I'll definitely need replace those really soon.
The one thing I would really like to do is use two strips of metal inside the bags. One strip to go between the top part of the mounts and one strip for the bottom. This would help distribute the weight of the bags more evenly and alleviate my fears of the mounting brackets eventually breaking the fiber glass due to vibration and spine jarring bumps.
All in all, I love them. They look great on Selene and are well worth the money paid. My only real complaint is the fact that everything is riveted to the bags. The hinges, the clasps and the prop arm aren't screwed in place, they are riveted. This makes it impossible to readjust anything if you find it isn't fitting right.
I have yet to test the ability of the bags to keep out water. The only bad weather I've been in is thick fog. I got soaked, but the bags barely got wet. The rubber seals seem snug, but the only real test will be a down pour. I'm sure the Maritimes won't have any issues providing me with testing grounds.
Now I'm seconds away from ordering a new Corbin seat. I'd tell you why, but Joey would kick my ass...


